3D printing: Difference between revisions
No edit summary |
(→important terms: - started fixing up spelling) |
||
| (5 intermediate revisions by 2 users not shown) | |||
| Line 24: | Line 24: | ||
'''STL, OBJ, and Gcode files''' | '''STL, OBJ, and Gcode files''' | ||
There are | There are 3 types of files you will be using the majority of time when it comes to 3D printing: either an .STL or .OBJ file, and a .gcode file. In simple terms, the stl and obj files are ways of storing an object in a 3 dimensional form digitally. The G-code file is a series of instructions telling the 3D printer how to turn that digital object into a physical item. For a deeper dive into G-code, see the wiki page on [[Editing gcode files]]. | ||
''STL file:'' | ''.STL file:'' | ||
An STL file, or Standard Triangle Language, is a file format allowing for a detailed 3 dimensional model to be created, in detail, using triangles. If you want to know more see the | An STL file, or Standard Triangle Language, is a file format allowing for a detailed 3 dimensional model to be created, in detail, using triangles. If you want to know more see the Wikipedia entry: [https://en.wikipedia.org/wiki/STL_(file_format) STL Files]. | ||
Many of the | Many of the models hosted on Thingiverse and similar websites provide their models as stl files. An stl file is easily recognizable for all of the Slicer programs we use at Tinkd to import and use. | ||
An STL file will look something like this | An STL file will look something like this: | ||
[[File:Stl file format.PNG]] | |||
You can see it is called a "3d object." This file can be moved, copy/pasted, and renamed like any other type of file. | |||
''.OBJ file:'' | |||
An OBJ or Object file is very similar to an STL file except it was initially designed for animation, but is now used by a variety of programs. The primary difference between the two is that an OBJ file contains material properties. More information can be found here: [https://en.wikipedia.org/wiki/Wavefront_.obj_file wavefront obj file]. | |||
''G-code File'' | |||
Primarily you will be using a Slicer to | |||
G-code is a popular programming language used in CNC manufacturing. In terms of 3D printing the G-code file is what tells the 3D printer where to move in order to create the object you want. to learn more about G-code see here [https://en.wikipedia.org/wiki/G-code G-code]. To learn about editing existing G-Code | |||
Primarily you will be using a Slicer to create the Gcode for our Printers. | |||
''Slicer'' | ''Slicer'' | ||
| Line 60: | Line 62: | ||
*great community support | *great community support | ||
*It's open source | *It's open source | ||
=How to print= | =How to print= | ||
''' | '''Getting the model ready to print''' | ||
* | *Open Prusa Slicer | ||
* | *Open file Explorer | ||
* | *Click on Nextcloud | ||
*Double click "TinkdFiles" | *Double click "TinkdFiles" | ||
* | *Find and double click on "First Print" | ||
*Double click on "Beginner" | *Double click on "Beginner" | ||
*Drag and drop "flexi shark Keyring" onto Prusa Slicer | *Drag and drop "flexi shark Keyring" onto Prusa Slicer | ||
* | *Check the settings match the below images | ||
[[File: | [[File:Settings_one_prusa.PNG]] | ||
[[File:Settings_two_prusa.PNG]] | |||
*click on "Slice Now" | |||
*Click on "Export G-code" | |||
*Remove the SD card from the Prusa printer | |||
*Insert the SD card into hub/dock/adpter on the computer | |||
*Create a new folder on the SD card with "yourname_gcode" replace "yourname" with your actual name | |||
*Save the G-code to the SD card in "yourname_gcode" folder | |||
*Eject the SD card | |||
*Insert the Sd card into the side of the front console on the Prusa Printer | |||
*Using the knob on the front, scroll down to your file | |||
*Press the knob to select it | |||
*Scroll down to your print file | |||
*Press the know to select it | |||
*Now you wait. | |||
'''Prusa Slicer''' | '''Prusa Slicer''' | ||
=Creating a 3d model= | =Creating a 3d model= | ||
Latest revision as of 12:15, 12 February 2023
Machines
Original Prusa i3 MK3S+ 3D printer
Resources and guides: Resources and Guides Prusa
Software
PrusaSlicer
To manipulate models/STL files and create Gcode file(3d printable file)
Tinkercad
used to create simple 3d models for printing, can also be used to modify existing models.
Thingiverse
open source, free website/database of 3d models for 3d printing.
important terms
STL, OBJ, and Gcode files
There are 3 types of files you will be using the majority of time when it comes to 3D printing: either an .STL or .OBJ file, and a .gcode file. In simple terms, the stl and obj files are ways of storing an object in a 3 dimensional form digitally. The G-code file is a series of instructions telling the 3D printer how to turn that digital object into a physical item. For a deeper dive into G-code, see the wiki page on Editing gcode files.
.STL file:
An STL file, or Standard Triangle Language, is a file format allowing for a detailed 3 dimensional model to be created, in detail, using triangles. If you want to know more see the Wikipedia entry: STL Files.
Many of the models hosted on Thingiverse and similar websites provide their models as stl files. An stl file is easily recognizable for all of the Slicer programs we use at Tinkd to import and use.
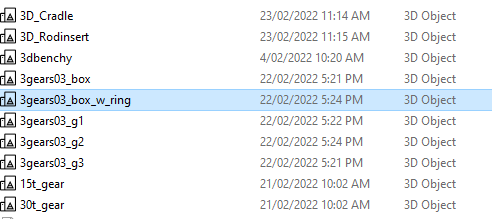
An STL file will look something like this:
You can see it is called a "3d object." This file can be moved, copy/pasted, and renamed like any other type of file.
.OBJ file:
An OBJ or Object file is very similar to an STL file except it was initially designed for animation, but is now used by a variety of programs. The primary difference between the two is that an OBJ file contains material properties. More information can be found here: wavefront obj file.
G-code File
G-code is a popular programming language used in CNC manufacturing. In terms of 3D printing the G-code file is what tells the 3D printer where to move in order to create the object you want. to learn more about G-code see here G-code. To learn about editing existing G-Code Primarily you will be using a Slicer to create the Gcode for our Printers.
Slicer
A slicer is a computer program that takes a 3D object, like that represented in an STL file, and converts it into the movements needed by a machine, like our Prusa printers, to create that object physically. Our workstations have several Slicer programs that are available though the primary one we use is called Prusa Slicer.
Thingiverse
Thingiverse is a website dedicated to sharing 3d models, STL files and projects that anyone can contribute to.
Why we like Thingiverse is:
- It's Free
- Huge variety in projects listed
- great community support
- It's open source
How to print
Getting the model ready to print
- Open Prusa Slicer
- Open file Explorer
- Click on Nextcloud
- Double click "TinkdFiles"
- Find and double click on "First Print"
- Double click on "Beginner"
- Drag and drop "flexi shark Keyring" onto Prusa Slicer
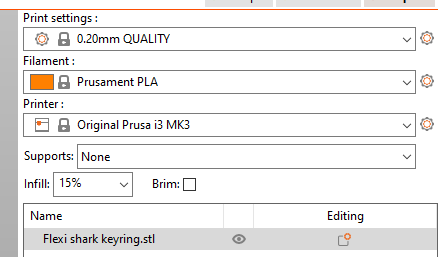
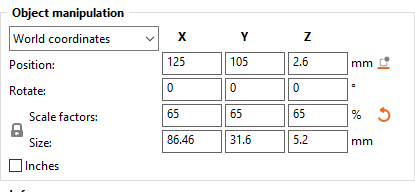
- Check the settings match the below images
- click on "Slice Now"
- Click on "Export G-code"
- Remove the SD card from the Prusa printer
- Insert the SD card into hub/dock/adpter on the computer
- Create a new folder on the SD card with "yourname_gcode" replace "yourname" with your actual name
- Save the G-code to the SD card in "yourname_gcode" folder
- Eject the SD card
- Insert the Sd card into the side of the front console on the Prusa Printer
- Using the knob on the front, scroll down to your file
- Press the knob to select it
- Scroll down to your print file
- Press the know to select it
- Now you wait.
Prusa Slicer
Creating a 3d model
Tinkercad


